Monday, March 5, 2012

Configure Alternative Domain Controller step by step


If you already have one domain controller in a domain, you can add additional domain controllers to the domain to improve the availability and reliability of network services. Adding additional domain controllers can help provide fault tolerance, balance the load of existing domain controllers, and provide additional infrastructure support to sites. This post will explain how to configure a alternative Domain controller step by step.


Requirements.

01. Domain Controller

02. Identical Server to Domain controller ( Ram ,hdd ,cpu and windows server version has to be the same )

03. IP Address of the Domain Controller.

04. Domain Administrator account


Step01

For this Demonstration im going to use the domain name as knights. Local and ip address as follows.


DC 01 (Primary DC)Dc 02 (Secondary Server)
IP Address: 192.168.1.1

Subnet Mask 255.255.255.0

Gate Way 192.168.1.125

DNS 192.168.1.1
IP Address: 192.168.1.2

Subnet Mask 255.255.255.0

Gate Way 192.168.1.125

DNS 192.168.1.1


Note: leave the Alternative DNS settings as 0.0.0.0. For both servers.

  • Login to the DC02 and run the command dcpromo from run
  • It will open the following window.


    • Click Next
    • In the Choose Deployment Configuration widow select existing forest and Add a domain Controller to an Existing Domain.
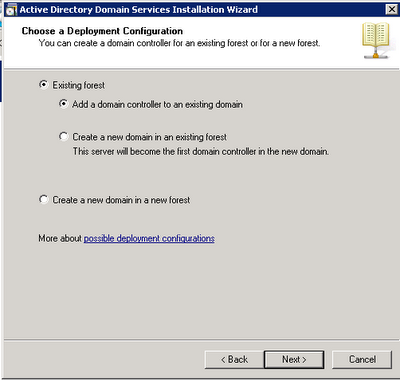


    • Type the domain name and select Alternative Credentials -> Set and give domain admin account and password.


    • Select the domain controller form next window.


    • Select the Default site from the next window


    • From Additional Domain Controller Options Window Click DNS and Global Catalog options and next.


    • Click yes in next warning window.
    • Accept the default location for Database , Log File and SYSVOL folder.


      • Give a password that you can remember for Directory Services Restore Mode Administrator Password


    • Export the settings and click next .

    • In the next window you can see the installation is running.


    • Now add the DC02 as the Alternative DNS in the DC 01.
    • Now you are done with creating secondary domain controller

    Thursday, January 5, 2012

    Installing VMware Tools in Ubuntu Server


    Installing VMware tools in VMware virtual machine is essential thing to run the VMware Machine Smoothly. You can find out more information about why we need to install VMware tools from following VMware KB article http://kb.vmware.com/selfservice/microsites/search.do?language=en_US&cmd=displayKC&externalId=340

    In this post describe how to install VMware Tools In Ubuntu


    • To run the VMware tools you need the gcc Compiler.to install

       
      • sudo apt-get install gcc

         
    • Go to VM –Guest – Install/Upgrade VMware tools.


    • Create a folder to mount the Cd

       
      • sudo mkdir /mnt/cdrom

         
    • Mount the Cd

       
      • sudo mount /dev/cdrom /mnt/cdrom

         
    • Copy the VMwareTools-<x.x.x-xxxx>.tar.gz to tmp folder

       
      • sudo cp VMwareTools-<x.x.x-xxxx>.tar.gz /tmp

         
    • Un zip the tar .gz file

       
      • cd /tmp
      • sudo tar –xvzf   VMwareTools-<x.x.x-xxxx>.tar.gz

         
    • Run the setup from the unzipped folder

       
      • cd / vmware-tools-distrib/
      • sudo ./ vmware-install.pl –d
    • Restart the Machine
      • sudo reboot
    • It will show like this in the status tab after the VMware Tools Correctly Installed.


    Tuesday, April 6, 2010

    How to add Ubuntu workstation to Windows Domain


    I have tried few deferent ways to connect to the Ubuntu workstation to windows 2008 dc and after little research I found a way using likewise open.
    Likewise open is free tool that can add Mac Linux or UNIX like OS to Windows Domain. You should visit following site for more details

    http://www.likewise.com/index.php
    This is the step I Have done. This was done in a Ubuntu 9.10 workstation.
    For this I use a static IP address if you're using a DHCP check the configuration equal to you network In my environment im using a windows 2008 that has the following domain name
    knights. Local
    01. To assign a static IP address

    sudo gedit /etc/network/interfaces
    #keep the following line
    auto lo
    iface lo inet loopback
    #add the IP address to the network card one
    auto eth0
    Iface eth0 inet static
    address xxxx.xxxx.xxxx.xxxx
    netmask xxxx.xxxx.xxxx.xxxx
    gateway xxxx.xxxx.xxxx.xxxx
    02. then add the DNS to the resolv.conf file
    sudo gedit /etc/resolv.conf
    # Generated by Network Manager
    domain knghts.local
    search knights.local
    nameserver xxxx.xxxx.xxxx.xxxx
    03. Change the host as dns winbind in nsswitch.conf file
    sudo gedit /etc/nsswitch.conf
    # /etc/nsswitch.conf
    passwd: compat
    group: compat
    shadow: compat
    hosts: file dns winbind
    networks: files
    protocols: db files
    services: db files
    ethers: db files
    rpc: db files
    netgroup: nis
    04. Install likewise open
    sudo apt-get install likewise-open
    05. now add the pc to domain
    sudo domainjoin –cli join fqdn admini user
    Eg ; sudo domainjoin –cli join knights.local administrator

    After that restart the pc and you can log with your windows domain user to the Ubuntu workstation.


    Tuesday, February 9, 2010

    Configuring OCS Inventory 1.3 in ubuntu 9.10 step by step

    OCS inventory NG (open Computer and software inventory Next Generation) is a free tool that can use for track IT assets in a network (soft ware & Hard ware).This can be implement in Linux and windows and I prefer this in Linux because open source software works better in Linux.

    Follow the step as it is because it is the easiest way that I found

    Configured on a VM ware virtual pc that has following configuration

    • 256 MB Ram
    • 8 GB HDD

    Note :

    strongly recommend you to use a static ip for this Ubuntu workstation

    Requirements.

    01.Apache webserver

    02.MySQL Server

    03. PhpMyadmin

    04. Perl 5.8 or later

    Steps

    01.After the installation of the VM install the update and upgrade

    Note : If you have install VM tools visit following site for more details,

    sudo apt-get update

    sudo apt-get upgrade

    02. Install apache

    sudo apt-get install apache2

    03.Install MySQL server

    sudo apt-get install mysql-server

    Remember the password that you are giving for the mysql admin

    04.Installing phpMyAdmin

    sudo apt-get install phpmyadmin

    05. Installing open ssh server

    sudp apt-get install open ssh server

    06. Installing perl

    sudo apt-get install perl


    07. create a symbolic link to the phpmyadmin

    sudo ln –s /etc/phpmyadmin/apache.conf /etc/apache2/conf.d/phpmyadmin.conf

    08. install the following perl modules

    sudo apt-get install

    libxml-simple-perl libcompress-zlib-perl

    libdbd-mysql-perl libdbd-perl libsoap-lite-perl

    php5-gd build-essential libapache2-mod-perl

    libdbi-perl php5-perl php5-dev-perl

    09.Downlad the OCS inventory 1.3 and copy it to the temp folder

    0CS -R downladed folder/OCS_UNIX_SERVER-1.3.tar.gz /tmp

    10. Go inside the extracted folder and r run the setup

    Sudo sh setup.sh

    11. Give the full access to the ocs inventory folder to write and modify

    First give permiton to the user that are running the setup

    Sudo chown –R username /the/directory

    eg:sudo chown -R thushara /etc/tmp/OCS Inventory

    Then give wride permission

    Sudo chmod atrwx /the/folder

    eg: sudo chmod 666 /tmp/OCS Iventory

    12. change the following values in php.ini file

    Post_Max_Size to 20 MB

    Upload_max_Filesize to 20 MB

    Sudo gedit /etc/php5/apache2/php.ini


    13. Restart the apache server

    sudo /etc/init.d/apache2 restart

    14. open the firefox and go to the following link

    http//Ip address/ocsreports/install.php

    15. provide the user as root and the password that used when your installing Mysql sever .It will take a wile then click the continue and log in to the ocs inventory server with the default password that is

    User name : admin

    Password : admin

    Now you have sucsesfully installed OCS Inventory NG. :)

    take look at the folowing site too learn more about OCS Inventoey NG,


    Saturday, October 3, 2009

    Change Local Administrator Password In a Domain Envirement.

    In resent i had a problem that changing the Local Administrator Password in all the PC that are connected to the domain.and i never liked that go to every PC and change the password.I found a VB script to do that with out any problems. and it works on windows 2008 DC.

    01. Open the Notepad and copy and paste the following Script

    ' Change Local Administrator Password
    ' 23/09/2009
    '...............................................................


    On Error Resume Next

    Dim fso, CLAPP
    Set fso = CreateObject("Scripting.FileSystemObject")

    '--------------------------------------------------------------------
    ' Change the location as You wish
    ' This will list of computers that has change the Local Admin Password.
    '--------------------------------------------------------------------

    Set CLAPP = fso.CreateTextFile("c:\Logs\Local administrator Paawords.txt", True)

    Const ADS_SCOPE_SUBTREE = 2

    Set objConnection = CreateObject("ADODB.Connection")
    Set objCommand = CreateObject("ADODB.Command")
    objConnection.Provider = "ADsDSOObject"
    objConnection.Open "Active Directory Provider"
    Set objCommand.ActiveConnection = objConnection

    objCommand.Properties("Page Size") = 1000
    objCommand.Properties("Searchscope") = ADS_SCOPE_SUBTREE

    ' -------------------------------------------------
    ' Change the Domain Name To your domain name.
    ' DC=Domain name , DC=suffix (COM)
    ' -------------------------------------------------
    objCommand.CommandText = _
    "SELECT Name FROM 'LDAP://dc=Knights,dc=local' WHERE objectCategory='computer'"
    Set objRecordSet = objCommand.Execute

    objRecordSet.MoveFirst

    Do Until objRecordSet.EOF
    strComputer = objRecordSet.Fields("Name").Value

    '------------------------------------------------------------------------------------
    'Change the names of the Machines that not need to Change the Administrator passwords
    '------------------------------------------------------------------------------------
    if Instr(1,strComputer, "srv01") Then objRecordSet.MoveNext
    if Instr(1,strComputer, "srv02") Then objRecordSet.MoveNext
    if Instr(1,strComputer, "DOMAINCONTROLLER3") Then objRecordSet.MoveNext
    '-----------------------------------------------------------
    ' change the Password as you like
    '-----------------------------------------------------------
    strPassword = "P@ssword"


    CLAPP.WriteLine(strComputer & " " & strPassword)
    Set objUser = GetObject("WinNT://" & strComputer & "/Administrator")
    objUser.SetPassword strPassword

    objRecordSet.MoveNext
    Loop

    CLAPP.Close

    02.save this as CLAP.vbs
    03.Run it as logon script Using GPO .If you don't know how to do that see the following article.
    (http://www.petri.co.il/setting-up-logon-script-through-gpo-windows-server-2008.htm)
    04.if you want know more about VB scripting go to http://computerperformance.co.uk/vbscript.

    Sunday, September 20, 2009

    Port Security In HP Procurve 2610 Switch

    01. First You have to log on to the Hp pro-curve Switch using Putty Or Putty connection Manager.

    With The IP Address and giving the Usernames and Password

    02. After log in to the switch to configure the port security go to config by typing config in the command line inter face.

    03.Following will display the all the switch ports by list. If you wand know the port security in a specific port you can add the port no or range at the end of the command

    Command: (config)# show port

    Eg:(config)# show port-security 1-3, 45, 8

    04. Configuring Port-security

    Note : Maximum 8 mac address can be attached to one port.

    Command:
    (config)# port-security (Port-List) learn-mode configured address-limit (No of Address bind to the port-list) Mac-address(MAC Address) Action send-disable.


    Eg: (config)# port-security 28 learn-mode configured address-limit 3 mac-address 0016ea-834254 0017ea-834254 action send-disable

    05. Removing MAC Address from the list

    Command:
    (config)# port-security (port-list) address-limit (Mac Address Limit After deleting the intended Mac’s)
    (config)# no port-security (port-list) mac-address (MAC Address)

    Eg: (config)# port-security 20 address-limit 2
    (config)# no port-security 20 mac-address 001f3c-1d7adb

    06. After assigning Port security if you plug any PC that the MAC address is not in the
    Port list the network port will be locked and cannot access it until enabling that port

    07.How to unlock the port

    Command:
    (config)# interface ethernet (Port-List)
    (eth-Port no)# disable
    (eth-Port no)# enable

    Eg: (config)# interface ethernet 20
    (eth-20)# disable
    ES-HPSW48-01(eth-20)# enable